YARN: Bulky (5) – Gold, Black, Antique White, Rust; Black Cotton Thread (0)
MATERIALS: 5 mm / 3.5 mm Crochet Hooks; Poly Filling;
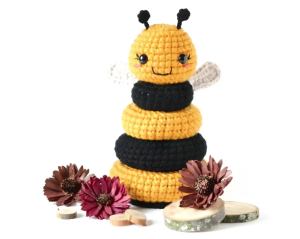
DIMENSION: 8” x 4”
ABBREVIATIONS: magic ring (mr), stitch (st), slip stitch (sl st), single crochet (sc), fasten off (F/O)
SKILL LEVEL: Beginner INSTRUCTIONS: work in rounds
(join with a sl st and ch 1 at the end of each round) unless otherwise instructed.
HEAD (yellow yarn; 5 mm hook)
Rnd 1: 8 sc in a mr (8)
Rnd 2: sc inc around (16)
Rnd 3: (1 sc, 1 sc inc) rep around (24)
Rnd 4: sc even (24)
Rnd 5: (2 sc, 1 sc inc) rep around (32)
Rnd 6 – 8: sc even (32)
Rnd 9: (3 sc, 1 sc inc) rep around (40); start stuffing the head
Insert the plastic safety eyes between rnds # 7-8, 6 sts apart
Rnd 10: (2 sc, 1 sc dec) rep around (30)
Rnd 11: (1 sc, 1 sc dec) rep around (20)
Rnd 12: sc dec around (10); finish stuffing the head
Rnd 13: sc dec around (5); F/O, cut the yarn, close the hole and wave in end.
Embroider the EYELASHES and the MOUTH (between rnds # 8-10) with black cotton thread.
ANTENNAS (black yarn; 3.5 mm hook; make two)
Rnd 1: 6 sc in a mr, close the rnd with a sl st and then crochet 5 chs very tightly (6/5 chs)
F/O and leave a long strand of yarn to sew the antenna to the top of the head, between rnds # 2-3.
Embroider the CHEEKS (between rnds # 8-9) with rust yarn.
BLACK RING #1 (black yarn; 5 mm hook)
Rnd 1: work 16 ch, join the last ch to the 1st one and crochet 1 sc into the same st, then crochet 15 sc (16)
Rnd 2: (1 sc, 1 sc inc) rep around (24)
Rnd 3 – 9: sc even (24)
Rnd 10: (1 sc, 1 sc dec) rep around (16); F/O and leave a long strand of yarn
Sew the last round to the foundation chain – stuff as you go.
YELLOW RING #1 (yellow yarn; 5 mm hook)
Rnd 1: work 20 ch, join the last ch to the 1st one and crochet 1 sc into the same st, then crochet 19 sc (20)
Rnd 2: (1 sc, 1 sc inc) rep around (30)
Rnd 3 – 9: sc even (30)
Rnd 10: (1 sc, 1 sc dec) rep around (20); F/O and leave a long strand of yarn
Sew the last round to the foundation chain – stuff as you go.
BLACK RING #2 (black yarn; 5 mm hook)
Rnd 1: work 24 ch, join the last ch to the 1st one and crochet 1 sc into the same st, then crochet 23 sc (24)
Rnd 2: (1 sc, 1 sc inc) rep around (36)
Rnd 3 – 10: sc even (36)
Rnd 11: (1 sc, 1 sc dec) rep around (24); F/O and leave a long strand of yarn
Sew the last round to the foundation chain – stuff as you go.
YELLOW RING #2 (yellow yarn; 5 mm hook)
Rnd 1: work 28 ch, join the last ch to the 1st one and crochet 1 sc into the same st, then crochet 27 sc (28)
Rnd 2: (1 sc, 1 sc inc) rep around (42)
Rnd 3 – 10: sc even (42)
Rnd 11: (1 sc, 1 sc dec) rep around (28) F/O and leave a long strand of yarn
Sew the last round to the foundation chain – stuff as you go.
Position the bee’s head on the small black ring #1, secure it in place with pins. Use a long string of black yarn to sew rnd #12 of head to the ring.
WINGS (antique yarn; 5 mm hook; make two)
Rnd 1: 6 chs, 1 sc into the 2nd ch from the hook, 2 sc, (1 sc and 1 hdc) into the next ch, (1 hdc, 4 dc, 1 hdc) into the next one, keep working on the opposite side of the foundation ch, (1 hdc and 1 sc) into the next ch, 3 sc (16); F/O leave a long strand of yarn. Sew the wings to the back part of the small black ring.
POLE (yellow and black yarn; 5 mm hook)
Rnd 1: starting off with black yarn, 6 sc in a mr (6)
Rnd 2: sc even (6)
Rnd 3: (2 sc, 1 sc inc) rep twice (8)
Rnd 4 – 5: sc even (8)
Rnd 6: switch to yellow yarn, (3 sc, 1 sc inc) rep twice (10)
Rnd 7 – 9: sc even (10); start stuffing
Rnd 10: switch to black yarn, (4 sc, 1 sc inc) rep twice (12)
Rnd 11 – 13: sc even (12)
Rnd 14: switch to yellow yarn, (5 sc, 1 sc inc) rep twice (14)
Rnd 15 – 18: sc even (14); finish stuffing
Rnd 19: working in BLO, sc dec around (7); F/O and leave a long strand of yarn.
Close the hole and wave in end.
…let’s crochet the pole base…
Rnd 20: join yellow yarn to any one st of rnd #18 of the pole, sc inc around (28)
Rnd 21: (1 sc, 1 sc inc) rep around (42)
Rnd 22: sc even (42)
Rnd 23: switch to black yarn, sc even (42); F/O and wave in ends.
Enjoy!
Designed and photos by @elisascrochet